Pattern: Fair Isle Hat by Sheila Joynes (Vogue Knitting, Fall 2010)
Yarn: Lana Grossa Merino Superfein
Colorway: dark blue, dark green, beige, dark red, light blue, dark camel (where are the labels???)
Price: ?
Amount: less than one ball of each color, I actually think there is enough left to make a pair of mittens
Needles: 3 mm
Gauge: Swatching for small projects is kind of a waste of time, i.e. I was lazy and didn't swatch. It might not have been the worst idea though, because the hat is a tiny bit too big.
Dimensions: It fits my head, but it could be a bit smaller, but still, it's ok.
Modifications: I changed the colors. The original hat is dominated by blue and cool colors and I wanted something with warmer colors. The crown section got shortened.
160 stitches
Crown shaping:
row 1: *k2tog, k5, ssk, k1. Repeat from *.
row 2: k
Repeat rows 1-2 1 more time.
4 rows: *k1 dark blue, k1 light blue. Repeat from *.
5th row: *ssk and k1 dark blue, ssk and k1 light blue. Repeat from *.
6th row: *ssk dark blue, ssk light blue. Repeat from *.
Comments: It's probably one of the most beautiful things I've ever made. :) Creating new color combinations can be so tough, at least for me. What I have noticed is that if you combine two colors together, it might be a good idea that they have distinctive values, otherwise you can't see the pattern well.
More information about color theory be found here: http://www.knitty.com/ISSUEfall04/FEATcolor.html


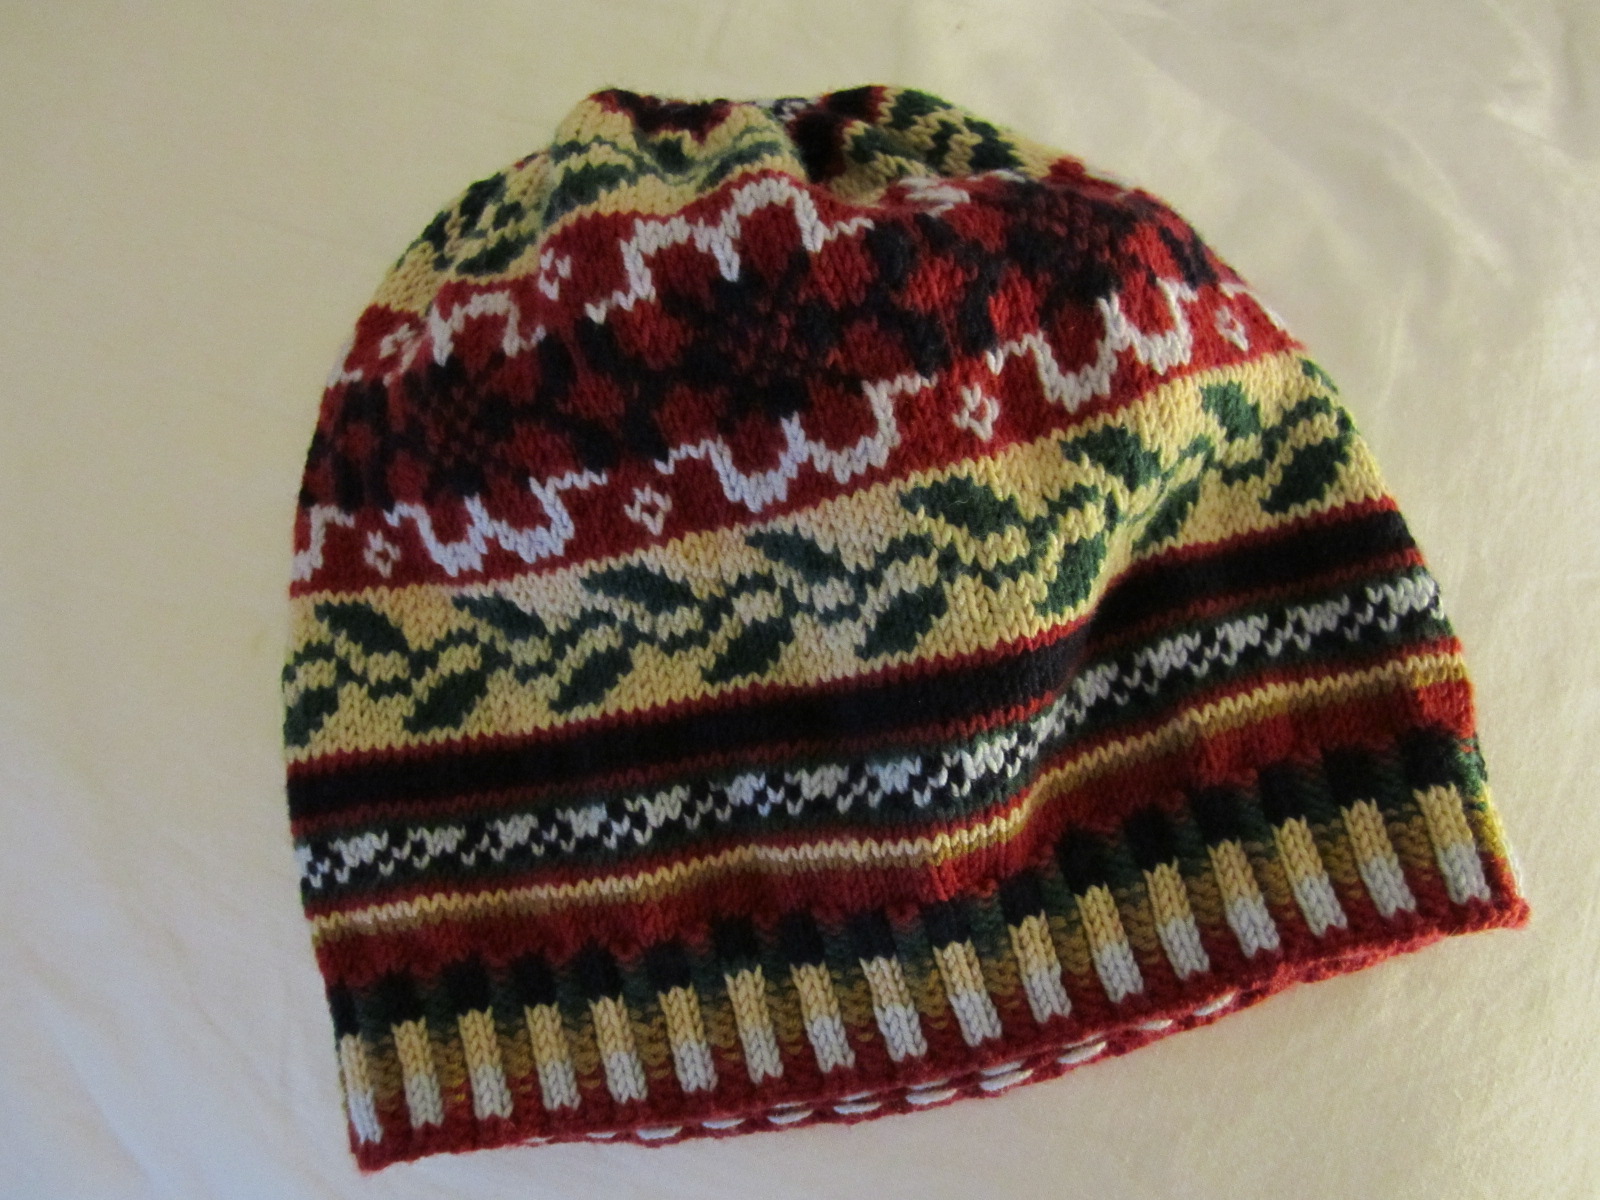

Sunday, March 27, 2011
Finished: Fair isle hat
Thursday, January 13, 2011
Finished: Deep V Argyle Vest
Pattern: Deep V Argyle Vest by Eunny Yang
Yarn: "Filcolana Gotlandsk Pelsuld"
Colorway: purple and gold (215 and 164), the other colors are also great
Price: nearly 10 € for 100 g
Amount: 1 skein (100 g) of each color
Needles: 2.5 mm (for the tubular cast-on), 3 mm for the rest of the ribbing, 3.75 mm for the fair isle pattern (I think I should have gone up with the needle size though, the knitting is fairly tight)
Gauge: I was lazy and didn't swatch... (I know! I know who is reading this blog and I know what you want to say! :p) I think sometimes I do completely irrational things just to defy whatever higher entity is out there. And when I'm lucky, I feel special and think I have control over this chaotic process called life. When I'm not lucky, it becomes another unfinished project...
Dimensions: My size.
Modifications: I was really lazy with one, so I didn't really modify a lot and just hoped that it would turn out fine. Picked up 3 out of 4 stitches for the arm and neckline. 96 stitches total for each arm. The ribbing is in a different color, because there wasn’t much of the other one left and I didn’t want to start a new skein. I actually like that.
Comments:
I started this project twice before. Once with red and black yarn, then with white and blue yarn. The latter didn't have gauge, but I'm not sure, I also didn't really like the color combination when it was knit. My personal feeling is, you need colors with a high contrast, then it looks good. If the colors are too similar, the pattern blurs.
Eunny only explains in the instructions how to decrease, but not to increase. You can find the explanation on her blog though: http://www.eunnyjang.com/knit/2006/11/tips_tricks_and_treats.html
Tubular cast-on, 2x2 rib. Did k2, p, k2 instead of k4, p, k4. I used 2 mm needles for the four setup rows and then switched to 3 mm needles.
Techknitter’s method for joining in the round looks interesting, but it was too complicated with the tubular cast-on, so I just slipped the first stitch and knit it together with the last one, but still, I might use her method for other projects: http://techknitting.blogspot.com/2007/01/circular-knitting-3-in-1-techjoin_26.html
I held the gold color in the left hand and purple in the right. I think when the pattern color is much darker than the main color and the pattern is actually really dominating, then I should nevertheless switch the colors and hold the main color in the left hand and the pattern color in the right hand. The stitches I do with my right hand are much tighter than the stitches I get when continental knitting.
The pre-cut state:

Every time I read about people cutting steeks the first time, I feel bored with the descriptions of the angst and anxiety that these women go through. Since so many people have cut steeks before them, it shouldn't be such a great deal, right? Since cutting a steek didn't look like it would provide me with enough excitement and thrill, I decided to take it up a notch. Instead of cutting through the middle stitches and have 4.5 stitches left for the edge, I thought I should try to reduce the bulk and leave only 2.5 stitches for the edge. Being a smartass sometimes can be wonderful, but in this case, it was a bad idea. Things started to unravel and I had to come up with fancy knots and surprising ties to prevent my vest from becoming another unfinished project. Since I'm not totally stupid, I had tried this experiment on the backside of the neck where you only cut a couple of stitches which helped to keep the problem below catastrophy level. As you can see in the following pictures, the stitches at the neck are a bit loose, but well, I think the damage is under control.


2.5 was a bit low, but well, I thought 3.5 would be ok. So, for the rest of the neck and the armholes, I stuck to 3.5 stitches for the edge. I used some alpaca leftovers for crocheting the edge.


I think the vest fits better if you have a long torso, otherwise it’s a bit too long. The armholes also strike me as a bit too big. The width is ok above the waist, but below it’s a bit too tight. The steeks are a bit bulky. The pattern is pretty easy and it's a fast knit. If you have never done fair isle before then this would be a good first project.
Looks ok overall, but could use some improvement in some points. The yarn is a bit scratchy.


Saturday, April 04, 2009
Finished: Endpaper Mitts
Pattern: Endpaper Mitts by Eunny Jang
Yarn: Baby Alpaca by Lang, 170 m/50 g, 100 % alpaca, recommended needle size 3 mm, gauge 26 stitches x 34 rows = 10 x 10 cm
Color: red and orange
Price: € 6,.per ball
Amount: less than a ball in each color
Needles: 2 mm for the ribbing, 2,5 mm for the body
Gauge: I'm counting 18 stitches in 5 cm (much tighter than is recommended)
Dimensions: fit my hand like a glove
Modifications: I exchanged the colors on the second mitt, because not only do I suffer from second-sock-syndrome, but also from second-anything-syndrome. I'm so glad that when you do fair isle, you can exchange the colors. I'll probably have to introduce that when knitting fair isle sleeves (just kidding <- I had to add this, I'm sure some people would really believe that I was capable of doing something like that... :D)
Tubular cast-on: I'm trying to gather my diffuse memories... I started like here, but used a thinner cotton yarn to wrap the loops with my working yarn around. I also started with 2.5 mm needles. The first row was purl, *slip purlwise with yarn in front, ktbl, repeat from * until last stitch. Knit that one. Next row: P, then *slip purlwise with yarn in front, ktbl, repeat from * until last stitch. Knit that one. Join in the round. Take the last stitch (a knit stitch) and pull it over the first stitch (purl stitch), so that the first stitch is inside the last stitch, held by the right hand needle and the last stitch is on the left-hand needle. Knit the last stitch. I'm not sure if I continued with two more rows of alternating slip purlwise with yarn in the front and k, respectively slip purlwise with the yarn in the back and p or if I just continued with the regular 1x1 ribbing. When you change to normal ribbing, also change to 2.0 mm needle.
I started doing my tubular cast-ons like this, because for one project I once would have needed 1.5 mm needles, which are not in the standard range of the yarn shops here, you have to order them. If you want your tubular cast-on to look good, you really have to go down with the needle size and then it's still not great, at least that's my experience. If I knit through the backloop it tightens the tubular cast-on a bit, making the whole thing a little neater. Since it makes the whole thing too tight, I have to use bigger needles than I would for the rest of the ribbing. If I do the tubular cast-on this way, the stitches are not too loose, it's still stretchy, I can use bigger needles instead of fumbling with small ones, and the edge is still nice.
Comments: I recommend the mitts as a first time project for anybody who has never done fair isle before. They are supereasy to make and the fair isle pattern is also not too difficult.
The mitts are quite tight. As you can see the false purled seam is not staying on the side, but is moving upward. I like them tight though.
The mitts keep my wrists warm, which is nice, but my fingers still suffer. If it's cold enough to wear handwarmers, then my fingers will also want protection, especially, since I nearly always have cold fingers. Anyway, I think they are really really cute. I especially like the color combination. I'm very happy with this project. :)
By the way, I complained about Alpaca from Drops, that ripping back was difficult, because the yarn had a tendency to felt. I thought that this was due to the quality of the yarn, but the Baby Alpaca from Lang is the same. It's more expensive and the yarn still has a tendency to felt.

Thursday, January 29, 2009
Finished: Anemoi Mittens
Pattern: Anemoi Mittens by Eunny Jang (who unfortunately stopped blogging, but her patterns are still available on her old blog or via Ravelry)
Yarn: Drops Alpaca, 100 % alpaca, recommended gauge: 23 stitches x 30 cm = 10 cm x 10 cm
Color: green (a nice pea green) and white (natural)
Price: was in my stash, but I think it's about 3-4 Euros
Amount: less than one ball in each color
Needles: 2.00 mm and 2.25 mm
Gauge: they fit, but I think for mittens they should have more ease to be warm
Dimensions: Small
Modifications: None
Comments:
The yarn:
The yarn does not strike me as of great quality. I used the same yarn once to crochet a small shrug/vest. After blocking I realized that it was too small and so frogged it. I then realized that the yarn had become really sticky and you had to tear at it in order to undo the stitches. It was the same thing with the mittens, once you knit it, you better not rip back. This is one of the few yarns I have worked with that seem to felt just by looking at them. It also became very fuzzy after washing.
The color range is amazing though. I really like the green, it has all kinds of light and dark speckles of green in it. Not a boring yarn to look at. And it's also soft and nice to touch.
There's some bleeding when you wash it.
The gauge:
I just measured and I get 20 stitches over 5 cm, which means I managed to press a lot more stitches into a cm than what the band said. This is a bit weird, but the mittens look ok to me. I expected them to be a bit wider though since I didn't swatch. They fit, but I read that mittens are supposed to have a bit of ease to give the best insulation against the cold. I think next time I would use bigger needles.
Fair isle and yarn dominance:
If you want to do fair isle you need to know what yarn dominance means. The first time I heard about it was on Nona's blog. I didn't have any intention of doing fair isle at that time, but kept this piece of information in the back of my mind. I learned that:
1. One color will dominate and pop out more than the other (take a look at her two swatches that she shows for comparison).
2. It is the yarn that is carried below the other that will pop out more.
If you didn't get point 2, neither did I... But I like that I'm so smart and remember things that I initially didn't need, because when I did want to do fair isle, I remembered this thing about yarn dominance. Since I didn't get it completely then (not so smart maybe? :D), I had to investigate this issue further.
Reading Tia Judy and Très Chic Veronique helped me understand what was going on a bit more.
Then I saw a commentator at meangirl's blog say that she was an English knitter (like me!) holding the contrast yarn in her left hand and the main color in the right hand. I thought that as I had no clue what to do I should follow her like a good lemming and do what she did. I also learned from the blog post that you are not supposed to change the hand that carries the colors at your whim.
3. One hand, one color. Don't change. (We're talking about two color knitting and I use both hands instead of one hand to carry the yarn.)
I also consulted my favorite knitting blog, TECHknitter, that never fails me when I'm in dire need of a thorough and detailed explanation of a knitting technique. She explained in one of her comments that in her opinion it didn't really matter that much if the yarn was carried from below or above unless you have can achieve an even tension with both hands (of course, we all can), but that a color would pop out more when the hand that carries the color is your unfamiliar knitting hand. The tension will be looser and the yarn will be more prominent to see.
4. Carry the contrast color (=foreground color, pattern color, the color that you want to pop out) in the hand that you usually don't use for knitting.
If I understood it right, when you're an English knitter, you're on the safe side twice, because when you carry the contrast color with your weaker hand, the left hand, the yarn will also automatically ride below the other color.
Meangirl also has a nice picture tutorial for weaving in the background color (=main color, the color that predominates and is used most often) yarn when you have to carry it over a longer stretch of stitches. When you want to to weave in the contrast color, you have to wrap the contrast color anticlockwise and then the background color and then unwrap the contrast color. The background color stitch will be mounted with the back leg first, but in the next row simply knit into the backloop.
Useful video from Knitpicks that shows how to carry yarn: http://www.youtube.com/watch?v=O2L4Fo82zwk
After knitting the first mitten went so smoothly I thought I didn't need to pay that much attention to the tension with the second mitten and that if problems did occur blocking would resolve them all. The somewhat crappy looking mitten on the left side (I stole the idea with the reversed colors from Très Chic Veronique. Second-sock-syndrome has a cousin - second-mitten-syndrome) is proof of my sloppiness. You might notice that the cuff seems to look shorter and smaller. That's because it is. :( I had to reknit the cuff of the right mitten a couple of time and at that time I still tugged and checked that I wasn't knitting too tightly, etc. The cuff of the left mitten I knit once.
The blocked mitten looks a bit bigger, but usually knitted items shrink a bit after blocking. They are both the same size now.
After blocking:
Well, blocking did resolve nearly everything, except for the very very very tight cuff and the very prominent green. It seems the tension on my left hand was a lot looser than when I knit the right mitten.
Cast-on:
For the cast-on I did a tubular cast-on. I followed Ysolda's instruction for a long-tail tubular cast-on, but I'm not sure if in the end I did the same thing as she did... She said that it differed from the Italian method where you can pull out the yarn, while here the strand that creates the stitches would alternate. Well, my impression was that there was only one strand that created the loops, in the front and in the back and I have been able to pull out the yarn. I also didn't start with a slip knot (I used the needle to pull at the yarn between my fingers and then started making the stitches).
Edit: I was researching how to do a better tubular cast-on for a different project and just found this post by TECHknitter. I thought I had been following Ysolda's instruction, but actually what I did resembles more what TECHknitter did.
Overall I like the mittens. Nice quick project and I learned a couple of new things.


Saturday, January 10, 2009
Mittens and a wrinkled dress
I finished the "Summersplash" yarn and I'm quite happy with it. I just don't know what to knit with it? Another Morning Surf Scarf? I don't have one, but maybe I can find something else that goes well with the yarn, too.
Currently I'm working on two items - fair isle mittens and a winter dress.
This is the first fair isle project I'm doing (apart from playing around with swatches here or there) and I'm quite pleased with my tension. The back part with the spirals puckers a bit, but the palm side is quite nice.
The dress might have been finished already if I wasn't ripping back so much. It's not difficult to knit, but I continue to make modifications, which I don't like, but I think I now found a good solution.
When I took the picture I realized how wrinkled the dress looks. I guess, when I knit something I don't really care too much how it looks. I stuff my projects in plastic bags and that shows. But washing and blocking will take all your tears away, so why bother.